Manage Companies
Use the feature to create and manage business banking companies. All bank employees can view a company and its details. However, only those belonging to certain roles (Super Administrator, Manager, and Business) can create or update the business details.
Menu path: Customer Management > Companies
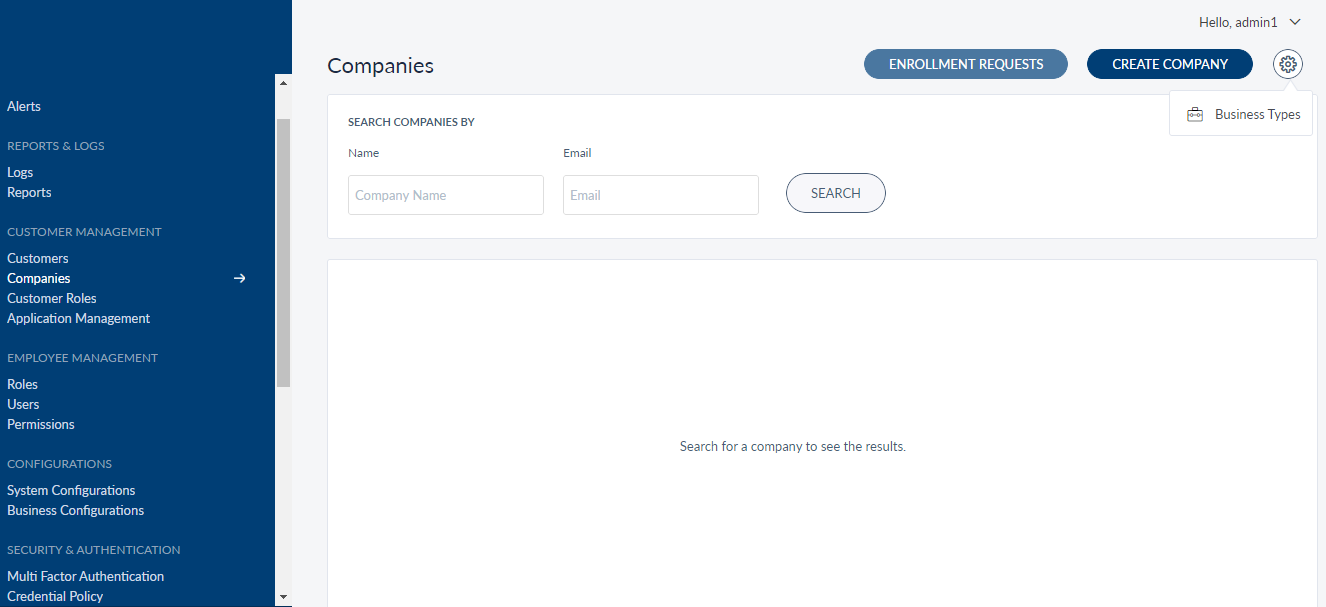
The app displays the search screen where you can search for business banking companies. This also is the main page of the Companies module.
You can do the following:
- Search for a Company
- Add a Company
- View Company Profile Details
- Edit Company Profile Details
- Manage Enrollment Requests
- Manage Business Types
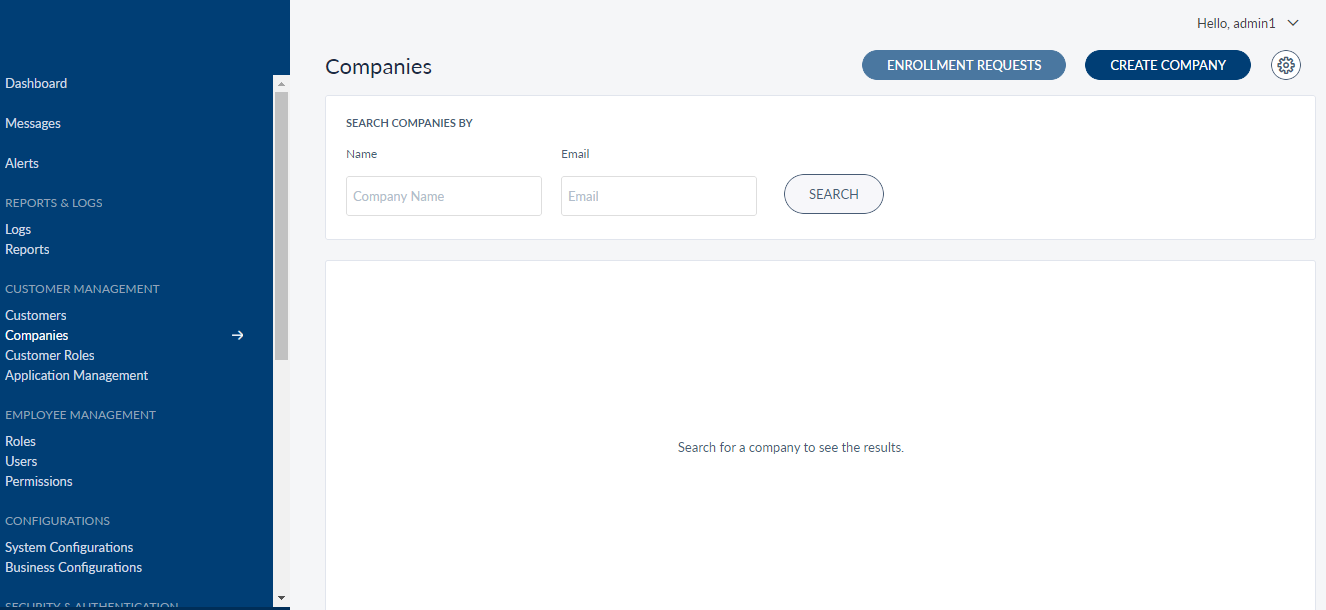
Search for a Company
Use the Search option to find a particular company using the following search criteria:
- Company Name
- Email ID
Menu path: Customer Management > Companies
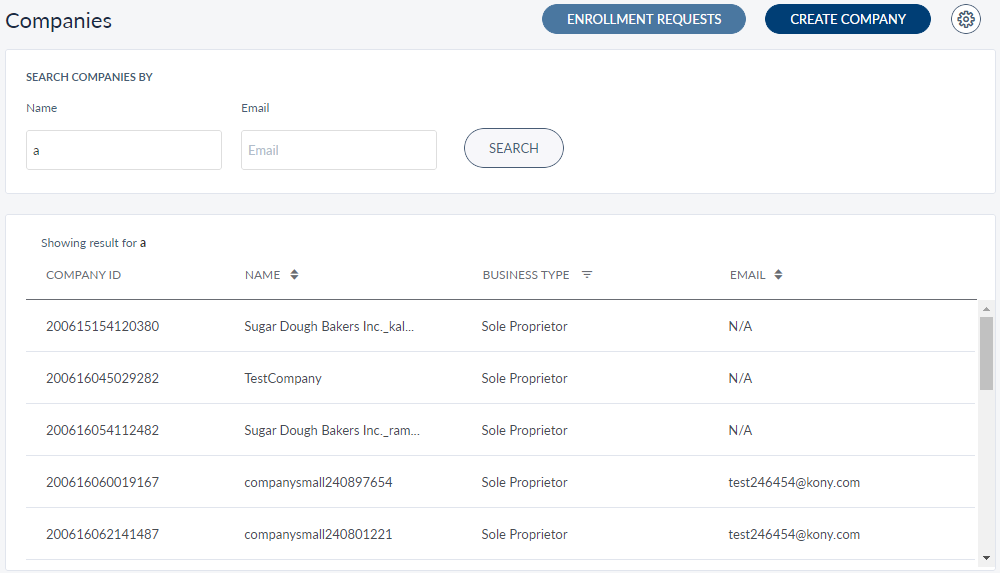
You can also search using a combination of both search criteria. You can enter the company name in full or in part. Click Search.
The application displays the list of companies matching the search criteria. If no matching records are found, it displays an appropriate message.
The companies list is represented as rows with the following details:
- Company ID
- Name of the company.
- Type of business
- Email ID
The list is sorted by Name by default, but you can sort the list based on the Email column by using the sort icon.
You can do the following:
- Click Create Company to add a company.
- Click any company record in the list to view the company details (profile).
- Click Enrollment Requests, to approve or reject the business enrollment requests received.
- Click Settings > Business Types to manage or create new business types.
Add a Company
Use the feature to add a business banking company.
Menu path: Customer Management > Companies > Create Company
The create company screen comprises four steps to capturing the required information - Accounts, Company Details, Assign Features, and Assign Limits.
Accounts
Use this feature to map or associate accounts with the company for managing the details online. While setting up the Temenos Digital application for the first time, you must configure the type of enrollment flow (based on the core banking system) you need. Broadly, you can configure the flow in one of the following ways:
- Account Centric
- Customer Centric
Follow the procedure depending on the core banking type.
Account Centric
If you have configured for an Account Centric core business banking, there may not be a relation between the various accounts held by a customer or business. This type of enrollment flow allows you to aggregate multiple accounts into a virtual company entity directly.
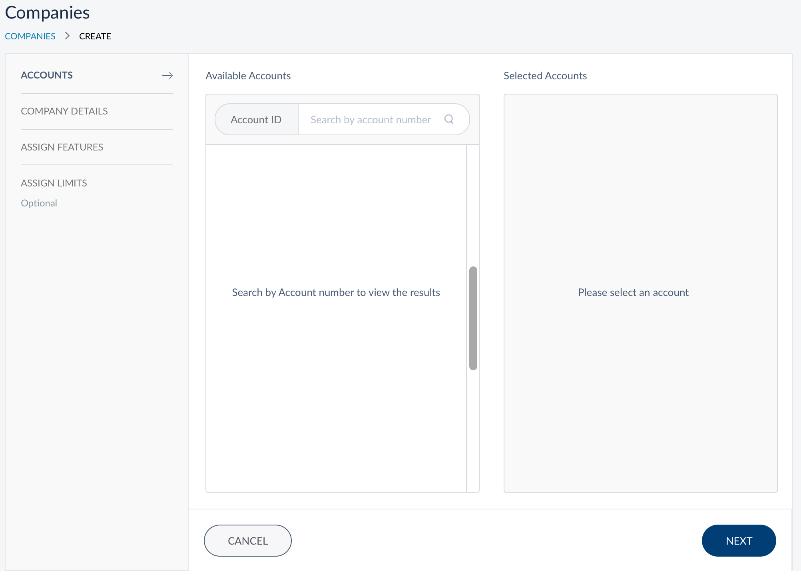
You can do the following to add accounts:
- You have to search each account manually from the Available Accounts section.
- Click Add to associate them to the company for digital access. The account is added to the Selected Accounts list.
- You can remove an account from the Selected Accounts list, or reset to start all over again.
- Proceed to assign features by using the Next button or the Assign Features tab.
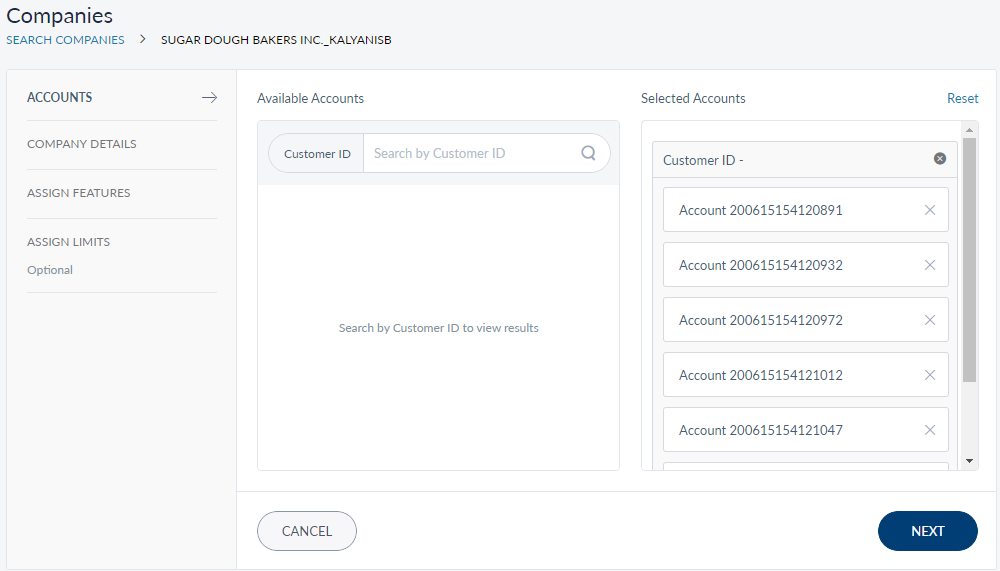
Customer Centric
If you have configured for a Customer Centric core business banking, you can list all the accounts associated with a customer or business by searching the related Customer ID.
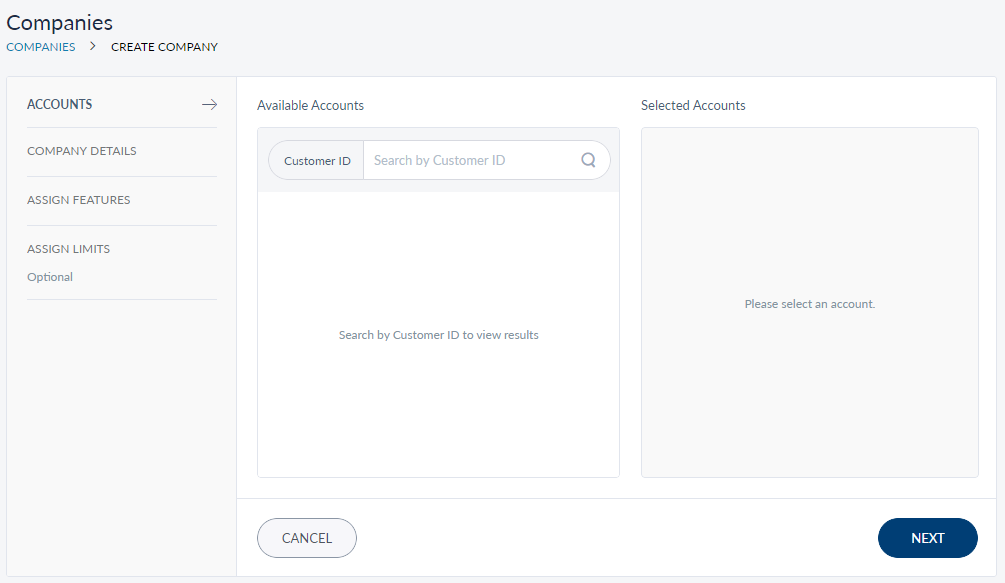
You can do the following to add accounts:
- You can search for the Customer ID in Available Accounts section.
- All the related accounts are displayed and you can click Add on the required accounts to associate them to the company for digital access.
- You can also add accounts linked to multiple Customer IDs to the new company. The account is added to the Selected Accounts list.
- You can remove an account from the Selected Accounts list, or reset to start all over again.
- Proceed to assign features by using the Next button or the Company Details tab.
Company Details
Add the following details.

All fields are mandatory unless specified otherwise:
- Company Name: Full name of the company. If you have added the accounts from a single Customer ID, this information is auto-filled.
- Business Type: Select the type of business the new company will operate.
- Contact Number: Companies Contact number with ISD (International Subscriber Dialing) code.
- Fax: Companies Fax number.
- Company Email: Company email address.
- Tax ID: Enter the unique TIN.
If you have added the accounts from multiple Customer IDs, then you have to select the required TIN from the list.
- Company address. Provide the address, zipcode, country, state and city where the company is located.
You can proceed to associate the accounts with the company by using the Next button or the Assign Features tab.
All the fields except Company Name and Business Type are optional.
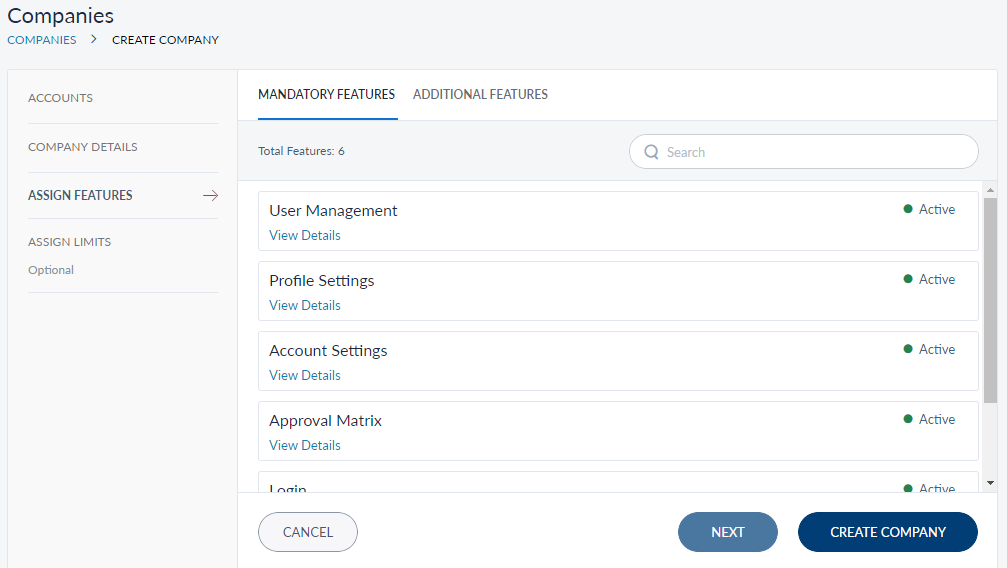
Assign Features
Features are a group of services that allow a bank customer to perform activities related to managing their various accounts. These features can be personal finance management, bill payments, funds transfer and so on. A set of actions are grouped under each feature for a better classification of services that are being offered by a financial institution. For adding a company, a bank employee with Admin or similar permission is required to assign features that are to be offered by the financial institution.
You can assign Mandatory Features and required Additional Features to the new company. The Feature tab shows a list of active mandatory features which are selected added to the new company by default in the Mandatory Features tab.
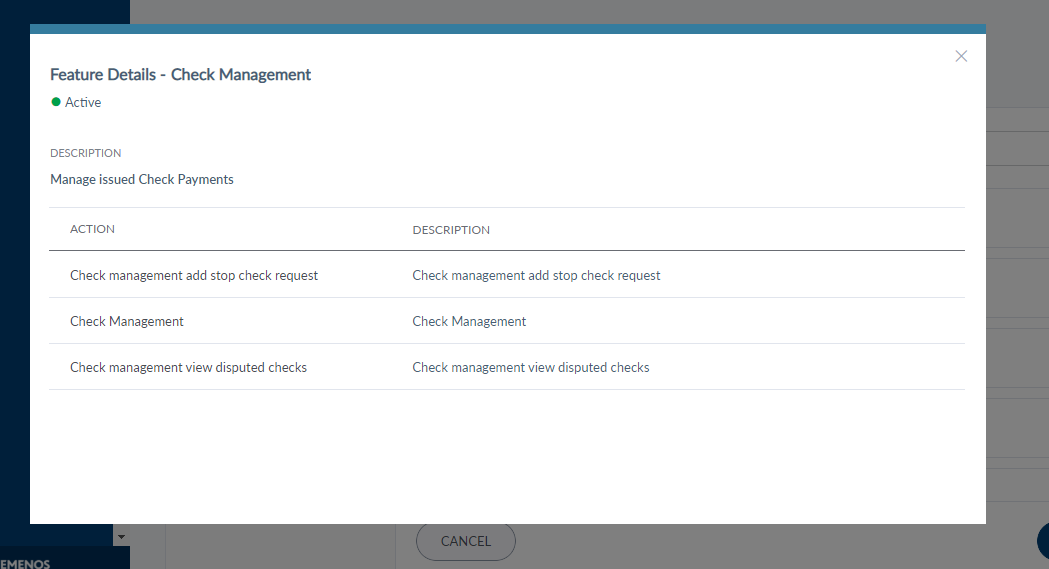
Click the Additional Features tab if you want to add more features to the new company. To see the set of actions associated with a feature, click the View Details button shown under each feature. Check the box against each feature you want to assign. Click Next if you want to assign limits to the features added or click Create Company to finish the process. If you click Create Company, the default limits prescribed by the Financial Institution is set to the features.
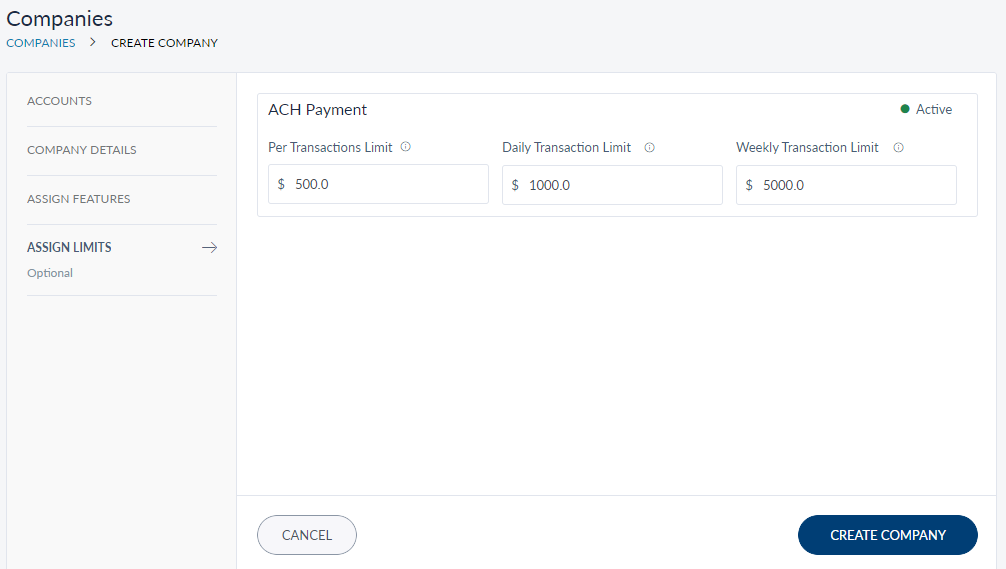
Assign Limits
The Assign Limits tab lists the selected features that involve transactions. The bank employee can assign limits per transaction, and for daily and weekly transactions. This is an optional step while adding a company.
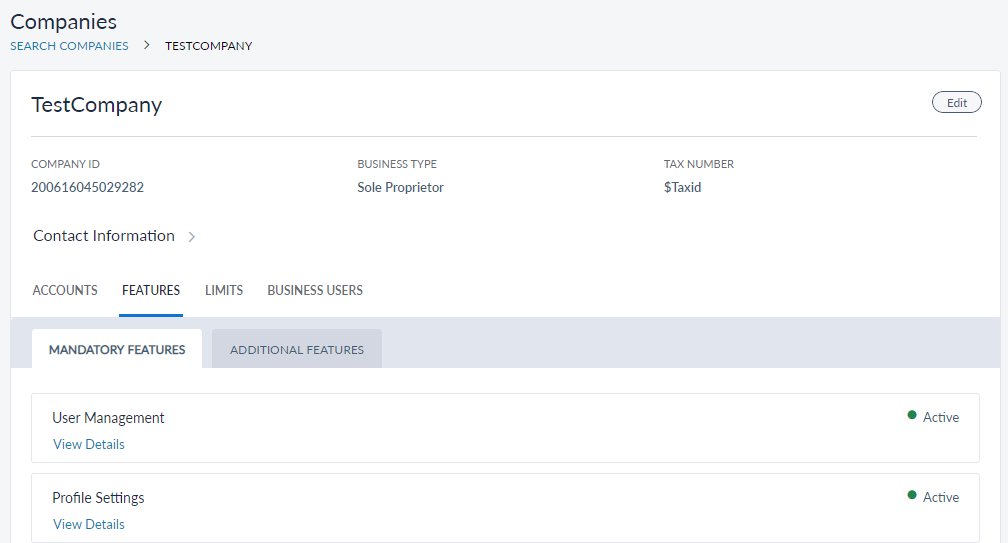
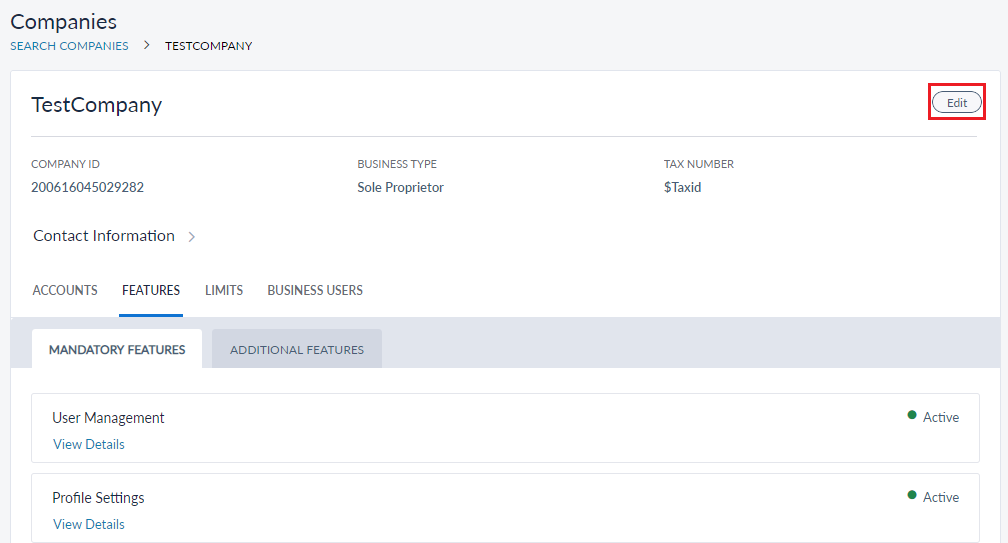
View Company Profile Details
Use the feature to view the profile details of the selected company and edit the details, if required.
Menu path: Companies > Search a company by Name or Email > Click a company row from the list
The application displays the following details:
Basic profile
- Company ID - The virtual Id created for the company in the banking core.
- Business Type
- Tax Number
- Contact Information - This section includes address details, contact number, fax number, and email address.
Accounts tab
Displays the list of mapped accounts with the following details. Sort the list using the sort icon:
- Customer Id (applicable for customer centric core)
- Account Type (Savings, Checking)
- Account Name
- Account Number
- Status (Active, Closed, Frozen, Dormant)
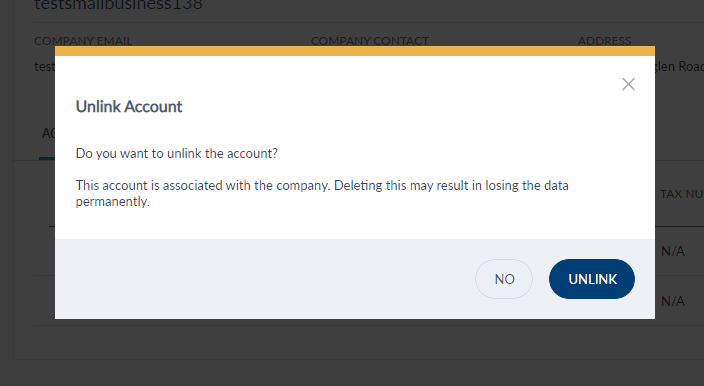
Unlink or disassociate accounts
Click the Unlink icon to disassociate an account with the company. The application displays an appropriate message when an account associated to the company is removed. On the confirmation screen, click Unlink. The account is removed from the list of associated accounts. If an account is removed for a company, the particular account association is removed for all the business users of the company as well.
Features
Features tab shows the active features available to be used by the bank customers. Features are a set of capabilities offered to the bank customers to perform banking activities on their respective digital banking websites. These functions include personal finance management, bill payments, funds transfer, applying for a loan, requesting for new bank account and so on. A group of actions are bundled into each feature which more or less have similar functions as their parent feature. The grouping of features and a set of actions mapped to each feature helps in better classification of banking activities and easy maintenance by the bank employees using the Spotlight application.
The Features tab had two sub-tabs namely - Mandatory Features and Additional Features which list the appropriate related features linked to the company. The bank employee with the required permission have the capability to suspend an Additional feature or a group of Additional features. The suspended feature and its corresponding actions will not be available as a service to its bank employees. To suspend a feature toggle the on / off button shown against each feature.
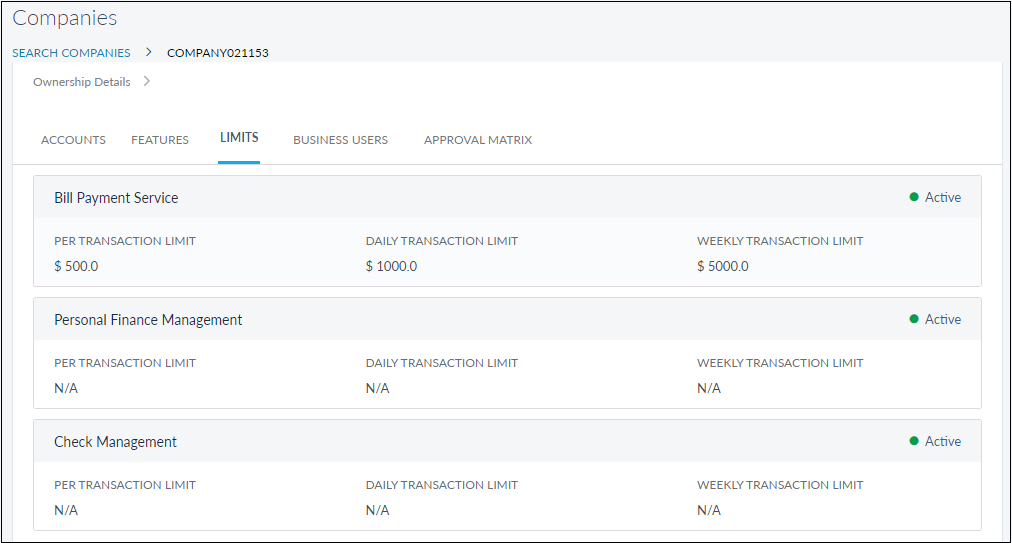
Limits
The Limits tab details the transaction limits set for the features. Only those features will be shown which were selected while adding a company and involve transactions such as bill payments, funds transfer and so on. The limits are shown per transaction and for daily and weekly transactions. The transaction limits can be modified by accessing the edit option for that account. For details on how to edit Limits, refer to Edit Company Details.
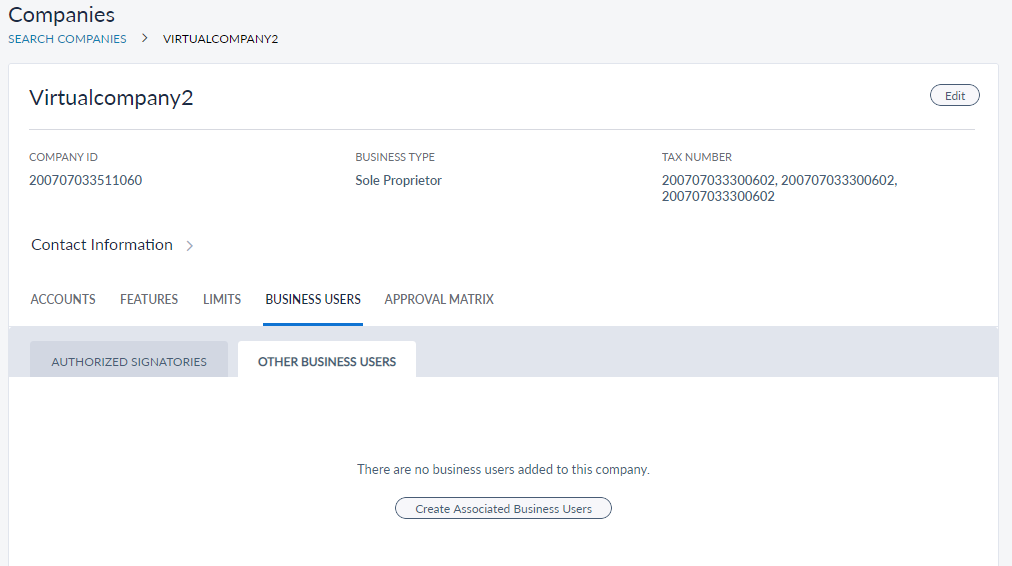
Business Users tab
The Business Users tab contains two sub-tabs namely Authorized Signatories and Other Business Users. The Authorized Signatories tab displays the list of users who are authorized to approve any requests received related to the company and can create other business users. If there are no Authorized Signatories created, the tab displays the option to create one. For details on authorized signatories, refer to Create Authorized Signatories.
The Business Users tab shows a business user or a list of business users associated with a company. A business user has the permission to access the accounts mapped to a company. One of the business users will have the administrator role whereas, there can be more than one associate business user with different roles defining the activities to be performed within the company account. For details on business user, refer to Create Business Users.
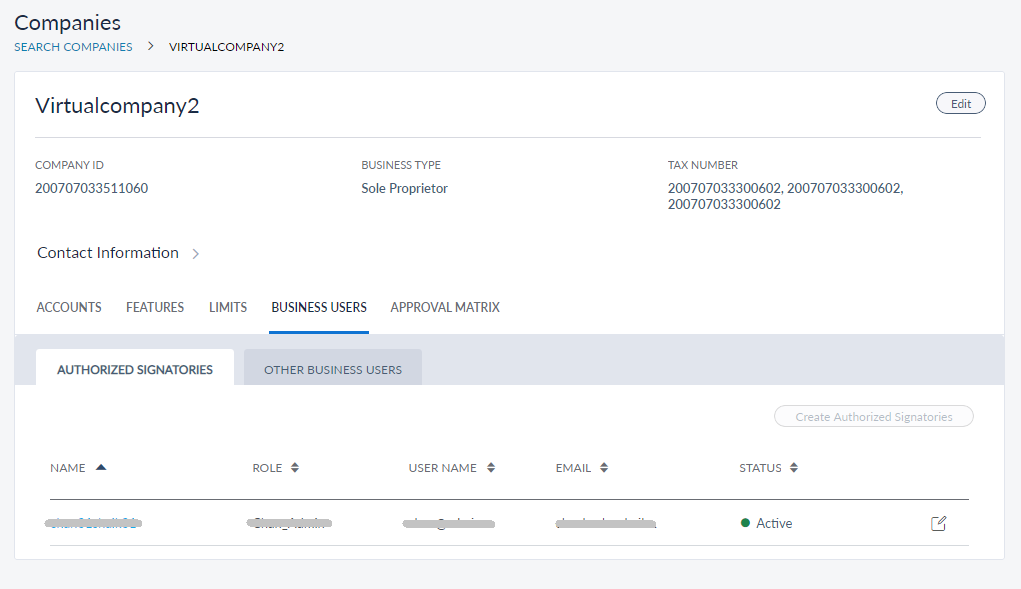
The list of business users are can be sorted using the sort icon. It displays information for the following fields.
- Name
- Role
- User Name
- Status (Active, Inactive)
- Email ID
- Edit the business user details using the context menu.
Click Create Associated Business User to add a business user.
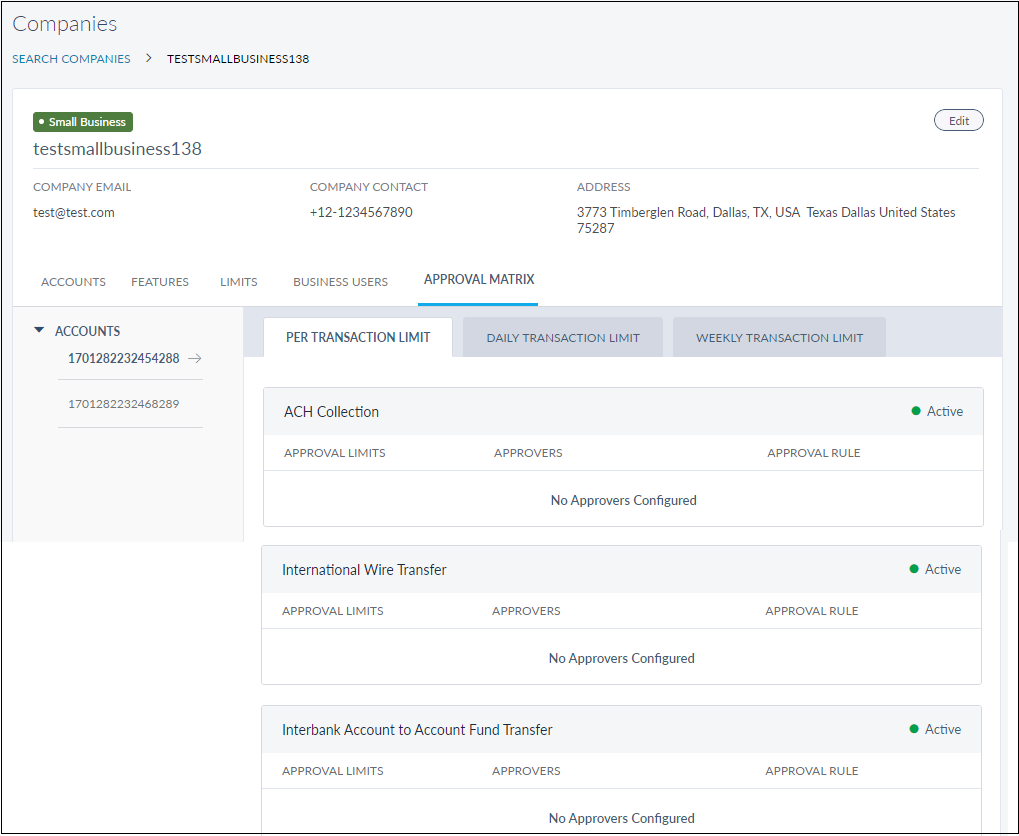
Approval Matrix
The Approval Matrix tab displays details on approval limits, approvers, and the approval rule used for each feature which involves transactions and are assigned for the company. This information is displayed per transaction limit and for daily and weekly transaction limits.
Edit Company Details
Use the feature to edit the details of a selected company.
Menu path: Customer Management > Companies > Company Profile screen > Edit
The edit screen is similar to the add a company screen with the provision to modify the details. Make the changes on the following tabs as required:
- Accounts: Adding more accounts does not directly make them accessible to all the users within the company. Access to the accounts must be given to the relevant users only. Removing accounts, dissociates them from the company and from the users.
- Company Details: The business type cannot be changed once users have been created for the company with roles that are specific to the selected business type
- Assign Features: Adding more features does not directly make them accessible to all the users within the company. Access to features must be given to the relevant users only. Removing access to features, makes the feature unavailable for all the users of the company
- Assign Limits: Changing the limits associated with the company may change the maximum transaction limits for the users associated with the company.
Make the required changes and click Update to save the details. The application displays a message that the details are saved successfully.
- You can cancel the process at any time. The changes are not saved.
- If an account mapping is removed for a company, the particular account association is removed for all the business users of the company as well.
- The application displays an appropriate message when an account mapping to a company is removed.
Manage Enrollment Requests
Business Enrollments through the Online Banking application may either be auto approved or require review and approval by the Financial Institution. This is controlled through the “Business Enrollments Approvals” setting in Business Configuration.
If the Financial Institution has disabled the auto-approval, the Business Enrollment requests that are raised through the Online Banking Application are sent for review to the Bank and are visible in Spotlight. The Bank Administrator can either approve or reject them by accessing the Enrollment Requests section.
Click Enrollment Requests, to view all the requests that are pending for approval.
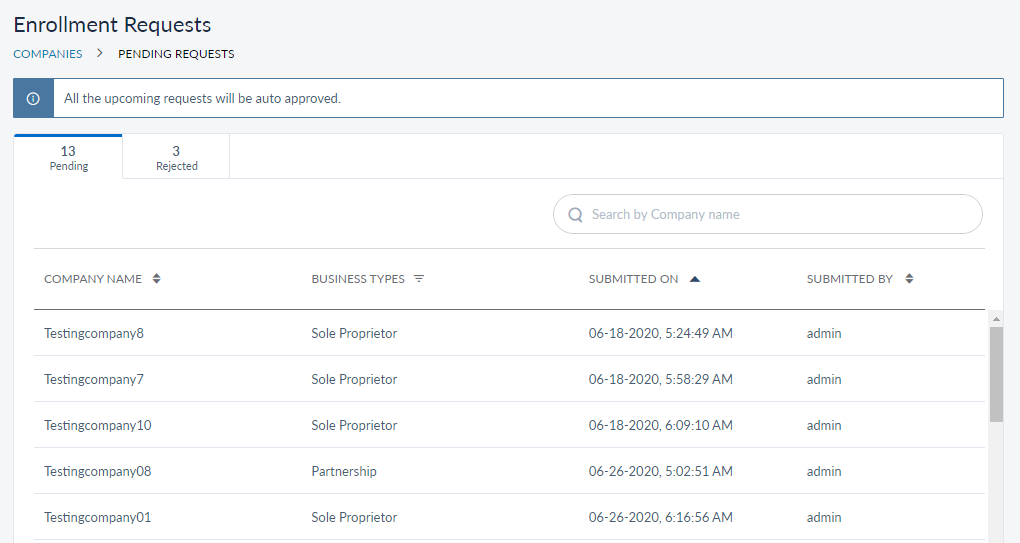
The following information is displayed about each request:
- Company Name: Name of the company requesting for enrollment.
- Business Type: The type of business that the company owns. You can add more business types from the Business Types section.
- Submitted On: The date on which the request was raised.
- Submitted By: The name of the user who raised the request.
This information is available under the Pending tab and this tab is selected by default.
Select the required company to view the detailed information about the company.
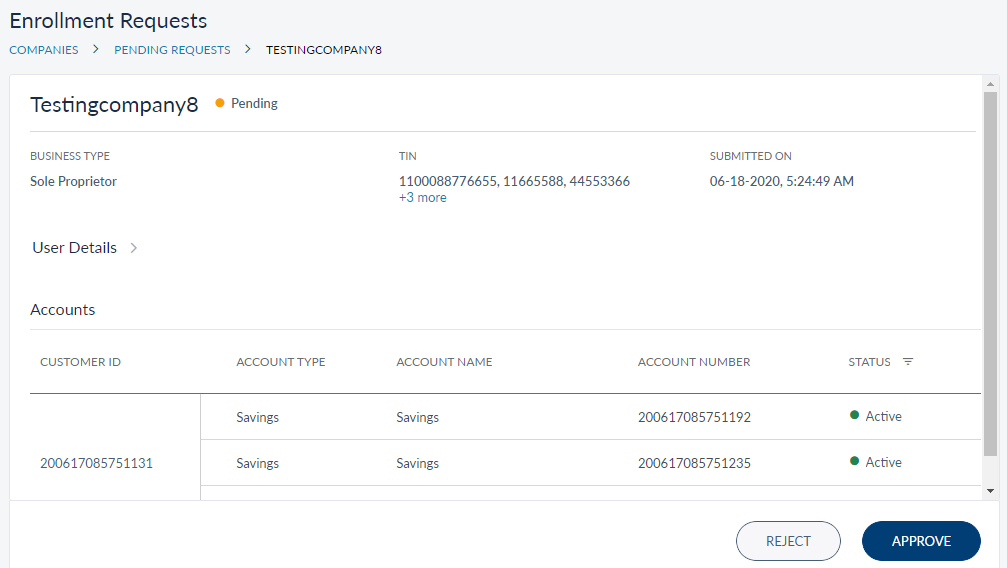
You can view the following information about the company when you select one:
- The TIN number.
- Click the User Details tab to view the information about the user who raised the enrollment request. You can view the details like First Name, Last Name, SSN and DoB.
- The accounts associated with the company with their respective details like Customer ID / CIF, Account Type, Account Name, Account Number, and its Status.
Based on the information provided, you can either Approve the enrollment request or Reject it. When you reject a request, the Reason to Reject window appears. Provide a valid reason for rejecting the request and click Reject.
When you approve an enrollment request the Company is enlisted the Companies module, the business user’s profile is created, the user is notified that the enrollment request is accepted. The user is sent an email with instructions to activate his profile.
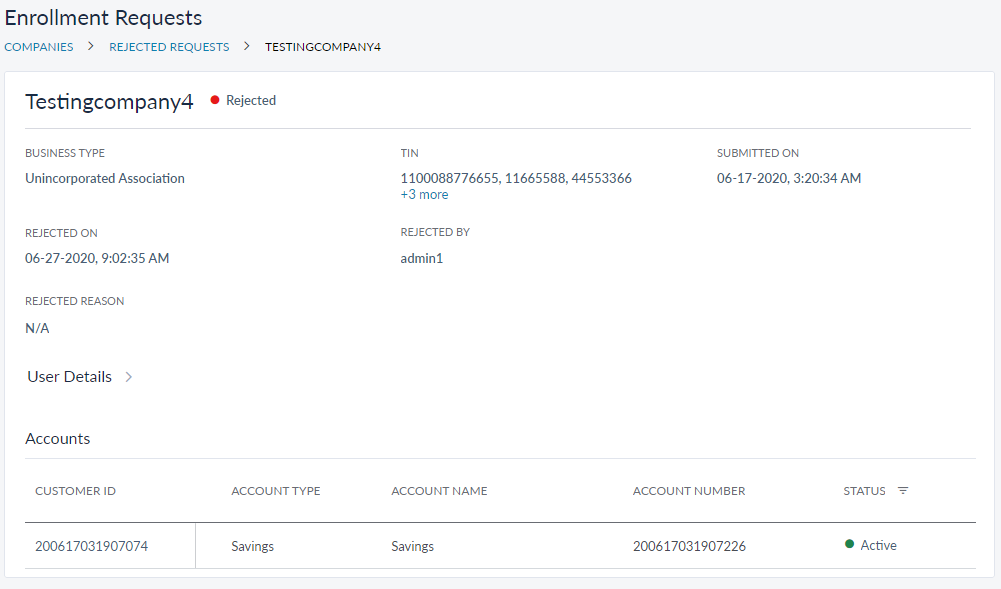
When you reject an enrollment request, the request is listed in the Rejected tab. Click the Rejected tab if you want to view the list requests that were rejected.
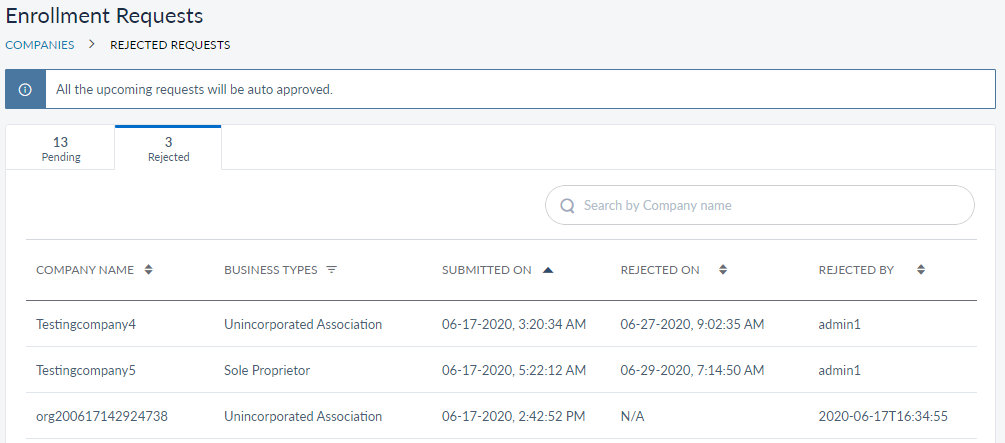
Apart from the information displayed in the Pending tab, following are the additional information available here:
- Rejected On: The date on which the request was rejected
- Rejected By: The name of the bank staff who rejected the request.
Similar details appear when you select a company to view the details in the Rejected tab as viewed in the Pending tab with an additional field for Rejected Reason.
If the Administrator has enabled the Auto Approval option in Business Configuration, a note is displayed on top of the page stating "All the upcoming requests will be auto approved" and all the enrollment requests received are approved automatically.
Manage Business Types
Use the feature to add a new business type or manage the existing business types.
Menu path: Companies > Settings > Business Type
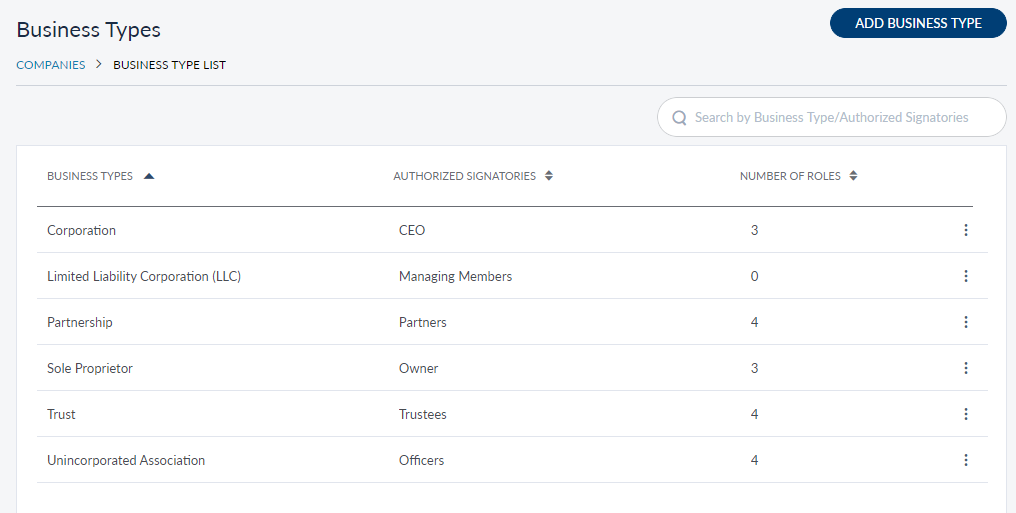
The Business Type section lists all the business types that are already available with the following details:
- Business Type: Name of the Business Type.
- Authorized Signatories : Role of the individuals who are authorized signers for the business for their respective business type.
- Number of Roles: Count of the number of customer roles created for users of the business type.
You can edit or delete the business type from the respective contextual menu.
You cannot delete a business type if it is associated with any company.
Add a Business Type
Use this feature to create a new business type.
Menu path: Companies > Settings > Business Type > Add Business Type
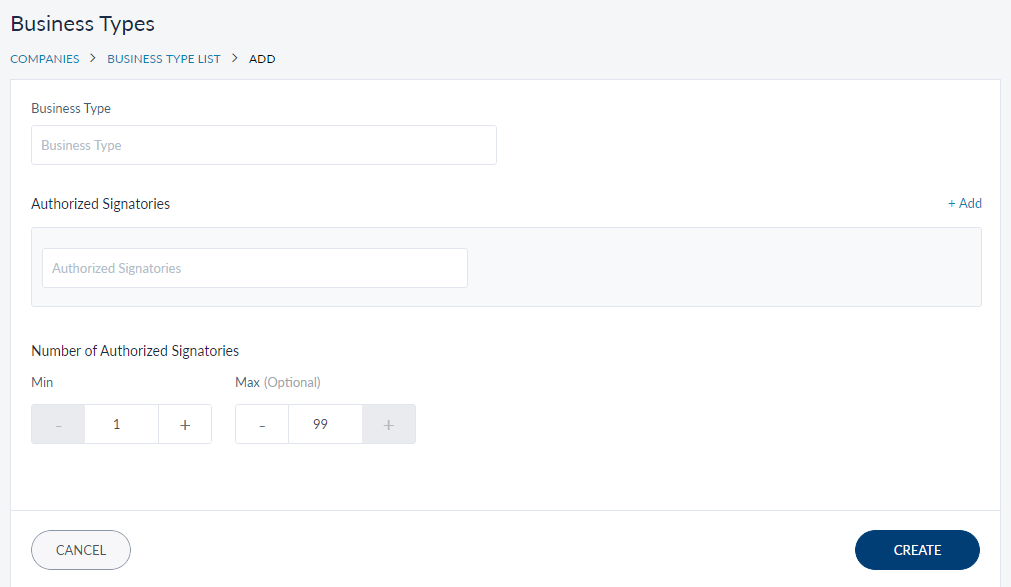
Provide the following information to create a new Business Type in the respective fields:
- Business Type: Name of the new business type.
- Authorized Signatories : Role of the individuals who are authorized signers for the business for their respective business type. To add more Authorized Signatories, click Add available adjacent to this field.
- Number of Authorized Signatories: Provide the number of minimum and maximum number of signatories. This defines the number of authorized signatories that need access to the online banking. Providing maximum number is optional.
- Click Create, the new business type is added to the business types list.
View a Business Type
Use the feature to view the business type details of the selected company and edit the details, if required.
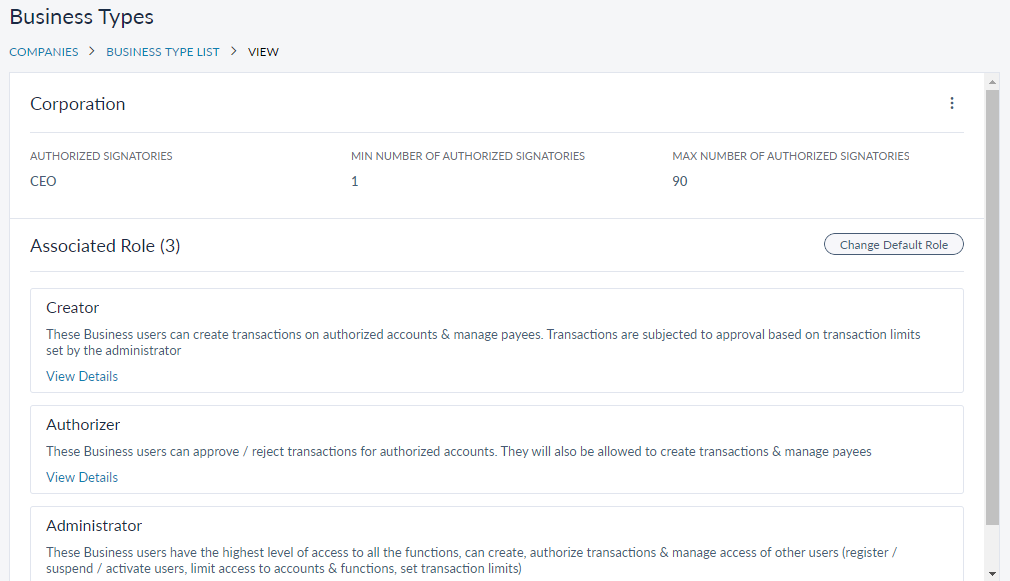
You can view the following information:
- Authorized Signatory.
- Minimum Number of Authorized Signatories for the selected business type.
- Maximum Number of Authorized Signatories for the selected business type.
- Customer roles associated with the selected business type.
Every Business Type is associated with on default role. New business users of the respective business type will be assigned with the respective default role. FIs have the flexibility to decide what the default role should be. You can change the default role associated with the business type from here. Do the following to change the default role:
- Click Change Default Role in Associated Role Section.
- Select the role from the list of roles.
- Click Save.
Edit a Business Type
Click the contextual menu > Edit of the required business type to edit it.
You can edit the following information:
- Business Type.
- Edit existing Authorized Signatory or Add new Authorized Signatory.
- Number of Authorized Signatories.
- Default role associated with the business type.
Click Update after you finish the changes.
In this topic